The Beginner's Guide To Dutch Braids Vs French Braids


Braided hairstyles have always been a popular choice for a quick way to get your hair out of the way and for a glamorous look, and can be styled by anyone from kids to seniors, from college athletes to ceremonial guests. Braids are styled like this, and over time, different braid types have been invented, but the two most traditional braid styles are the French braid and the Dutch braid. If you're wondering exactly what the difference is and how to implement these two different styles, keep reading.
1. Difference Between French Braids And Dutch Braids
1)Direction of crossings
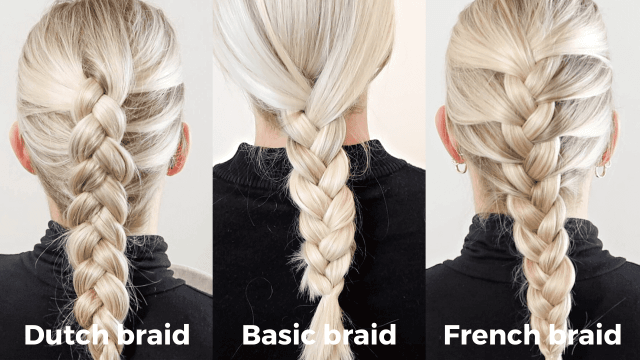
French sections are crossed over the middle, while Dutch braid sections are crossed under the middle.
2)Volume
French braids are typically laid flat against the scalp, creating a stylish and timeless look that works well with a variety of hair lengths and types. Dutch braids provide a more voluminous and dimensional look. They are perfect for those who want a bolder, more textured hairstyle.
3)Occasion and style
French braids are often preferred for formal occasions and events where a neat and polished look is required. Dutch braids have a bold, textured look and are more suitable for casual, everyday wear.
2. Before making a Dutch braid or a French braid, you need to prepare the following:
A hairbrush or comb for combing hair.
Elastic bands or bobby pins to secure braids.
It takes some patience.
3. Steps to create a Dutch braid:
1)Prepare your hair: Start with clean, dry, and detangled hair. Brush or comb your hair to remove any knots or tangles.
2)Choose your starting point: You can start your Dutch braid anywhere on your head. Common starting points include near the forehead, the crown of the head, or the nape of the neck.
3)Divide your hair: Divide the hair at the starting point into three equal sections. Hold one section in each hand and the third section in your fingers.
4)Begin braiding: Cross the right section under the middle section (instead of over, like in a French braid). The right section now becomes the middle section.Cross the left section under the new middle section. This is similar to the first step in a traditional braid, but you're crossing the sections under, not over.
5)Add more hair: Before each new crossover, add a small section of hair to the right and left sections. This is what creates the distinctive Dutch braid look.
6)Continue the braid: Repeat steps 4 and 5, adding more hair to each section as you go along. Keep braiding until you've incorporated all the hair from that section into the braid.
7)Secure the end: Once you've braided to the desired length, secure the braid with a hair elastic.
8)Pancake the braid (optional): For a fuller, more textured look, gently pull on the edges of the braid to loosen it. This creates a more voluminous effect.
9)Finishing touches: You can use bobby pins or a small hair elastic to secure the end of the braid and keep it in place.
4. Steps to create a French braid:
1)Prepare your hair: Start with clean, dry, and detangled hair. Brush or comb your hair to remove any knots or tangles.
2)Choose your starting point: You can start your French braid at the crown of your head, near the forehead, or at the nape of your neck. Secure the rest of your hair with a hair tie or clip if needed.
3)Divide your hair: Divide the hair at the starting point into three equal sections. Hold one section in each hand and the third section in your fingers.
4)Begin braiding: Cross the right section over the middle section. The right section now becomes the new middle section. Cross the left section over the new middle section. This is similar to the first step in a traditional braid but with three sections.
5)Add more hair: Before each new crossover, add a small section of hair to the right and left sections. This is what creates the French braid look. For a classic French braid, gather additional hair from both sides of your head as you braid.
6)Continue the braid: Repeat steps 4 and 5, adding more hair from the sides as you go along. Keep braiding until you've incorporated all the hair into the braid.
7)Finish the braid: Continue braiding until you reach the end of your hair. Secure the braid with a hair elastic.
Remember that practice makes perfect. French braid and Dutch braid can be a bit challenging when you first start, but with practice, you'll become more proficient. You can create various hairstyles, from simple everyday looks to more intricate updos.
Customer Also Reviewed